Showing posts with label puzzle. Show all posts

Thursday, December 29, 2011

Skyrim: The World-Eater's Eyrie / Skuldafn Temple / Sovngarde / Dragonslayer Walkthrough

This quest is relatively straight forward and probably does not require a lot of guidance, but there are a few stages that are more tricky and there are a couple of puzzles to solve.

This quest is first initiated when you use the Call Dragon shout on the Dragonsreach Porch to call Odahviing and trap him. Once you have him trapped and have a conversation with him, you end up getting him to reveal the location of Alduin's portal to Sovngarde and then flies you to Skuldafn.

Once you get to Skuldafn, there will be a number of high level Draugr (wraiths and deathlords) before you get to the door to head inside the Skuldafn Temple. I did not count exactly, but there are at least 8 Draugr (some deathlords, some wights, etc.) and there are two dragons. Be careful not to attract the attention of everyone all at once or it will be a very difficult fight.


Head up all the stairs and around the broken tower and up the stairs again to get up to the door that says Skuldafn Temple. This is where you want to go. You can check out the North and South Towers out here if you want as well, but there is not much to tell in them except some more Draugr. Once you get inside the Skuldafn Temple, you will enter a big room with a number of Draugr that come after you almost at once. Kill them and continue forward. You will end up heading up some stairs into a room where more Draugr will attack you. After you kill them, you'll probably notice there are three of the infamous pillars and two gates in front of you. The two side pillars need to be positioned so that the symbol that faces the nearest fire bowl matches the one carved there. The center pillar needs to match the symbol above the gate you want to open.

If you face the pillars from the gates, to open the right gate, you need to see bird - bird - bird and the left gate you should see bird - snake - bird. This is what is shown in the two pictures at the right. The right gate has a chest with not much in it and nothing else behind it. The left gate is the one you need to go through in order to continue with the quest.

After going through the left gate, you will go up some stairs to the left and end up on the walkway above a room with a single Draugr Wight below you. As you approach him, a Deathlord and another Wight will also begin to attack you. After you kill the three of them, head straight through where the Draugr Deathlord came out of. There will be frostbite spiders you need to kill in this area, but they shouldn't be much of a problem. Kill them and continue on along the corridor until you reach the double iron doors. Through these doors are another two Draugr - a Deathlord and a Wight. As soon as you open the doors you will notice another pillar. After killing all enemies you will probably notice that there is no exit from this room. The pillars are what provide the exit to you.

The picture on the left shows you the location we are talking about and will be the reference frame used for explaining the solution. While looking forward towards the wooden bridge that will drop, the pillar on your right needs to be set to the bird, the one to your left needs to be set to whale, and the one behind and below you needs to be set to snake. So that puzzle solution from left to right would be whale - snake - bird. These symbols come from the symbols shown in the mouths of the people corresponding to them. Going across the bridge will allow you to access a door that again is labeled Skuldafn Temple. You need to continue through this door to continue with the quest.

When you go through these doors you will enter a room that has another three Draugr in it. There is a Deathlord, a Wight, and a Scourge. Defeat them and continue up the stairs, across the bridge, and through the corridor to the spiral staircase. At the top of the spiral stairs is a room with three more Draugr and a gate that needs to be opened by lever. directly across the room from the gate is an iron door behind which is flammable oil on the floor which can help kill the Draugr. If you go through that door and turn left 180 degrees you'll see a lever that will lift the gate so you can continue forward.

As you continue forward through the passageway ahead, be careful of the flammable oil trap. When you turn left at the end of the corridor with this trap, straight ahead will be a puzzle door and a Draugr Death Overlord guarding it. Kill the guard and take the Diamond Claw from him to get through the puzzle door. The solution from top to bottom is wolf - moth - dragon (as shown at the right).

This door will allow you to enter a room with a word wall in it. This word wall gives you a word for the Storm Call shout. There are no more Draugr in this section of Skuldafn so you may go straight up to the word wall and then continue on without worries. If you continue toward the quest marker, you will get to a door that says Skuldafn. Be prepared before leaving through this door. After you leave the door, you will be in an area with three Draugr Deathlords, a Draugr Scourge, two Dragons, and a Dragon Preist. Be especially careful of the Dragon Priest as he has a staff that will do 50 shock damage per second. You can get to him before he grabs the staff, however, if you move quickly. He will start heading for it as soon as you go out the door - he is out the door and to the left and then up the stairs. Get to him as quickly as possible, but still try to avoid having all enemies attacking you at once.

Also, the wooden planks that go to a tower straight ahead of you as you exit the door, follow them before going through the portal. All the way at the bottom there is a chest with, among other things, a flawless diamond in it.

Once you have defeated all the enemies, you will be able to get to Alduin's portal to Sovngarde. To use the portal, you need to activate the Dragon Seal, then you can simply walk into the portal. If the Dragon Priest has not yet reached his staff, then all you need to do is to walk into the portal.

Once you have gone through the portal, you will need to make your way through the mist to get to the Hall of Valor. You will meet a soldier quite quickly who will tell you how to get there and will follow you. You need to simply keep walking through the fog and get to the bridge. When you get to the bridge to the Hall of Valor, you will meet Tsun with whom you need to talk and later fight in order to gain admittance to the Hall of Valor.

Once in the Hall of Valor, you will speak with Ysgramor who will tell you that they were all commanded by Shor not to attempt to fight Alduin, but that there are three who have been waiting for me to come which would be their cue to join you and drive Alduin out. As it turns out, these are the same three people who you saw fighting Alduin when you read the Elder Scroll to learn Dragonrend. Follow them back outside where you will finally get to kill Alduin. I found it easiest to use Dragonrend to keep him on the ground and attack him that way.

Once you have killed Alduin, there are some awesome animations as he dies and then you just need to go talk to Tsun again to be sent back to Nirn. When you talk to him and tell him you want to go back home, he teaches you a shout to bring a hero from Sovngarde to aide you - the Call of Valor shout. This is officially the end of the main quest. Congratulations on completing an Elder Scrolls game.

Tuesday, November 29, 2011

Skyrim: Revealing the Unseen / Mzelft Oculory Puzzle Solution

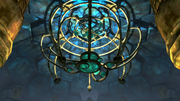
This is not a full walkthrough of the quest because most of it is very straightforward, but at the towards the end of the Revealing the Unseen mission, there is a puzzle. This puzzle occurs when you are in the Mzelft Oculory and you need to adjust the focus crystal.

All you need to do is use a frost spell (or maybe fire if you've already messed with it) on the crystal a few times until the beams of light each shoot into the center of a different ring around the ceiling. If you go use the buttons up on the platform, each of them rotates a different ring and each ring has a green crystal in it. You need to rotate each ring until the crystals are each hit by a beam of light from the crystal in the middle. It is quite a simple process once you figure out what you're supposed to be doing. Just use a frost spell a few times and then rotate the rings.

See the picture if you are confused about what this is supposed to look like.

Sunday, November 27, 2011

Skyrim Walkthrough: Discerning the Transmundane / Elder Knowledge

This quest combination most often begins with Paarthurnax telling you that you need to go find out about the Elder Scroll from the people at the College of Winterhold. Go talk to Urag and he will show you two books to read, one of which is nonsense.

The first thing you need to do after reading the book Ruminations is tell Urag that the "Ruminations" book is incomprehensible. He will tell you that probably the only person who can help you figure out what it means is Septimus Signus, who wrote the book. Keep talking to him and Urag will tell you that Septimus was obsessed with Dwemer artifacts and is now somewhere in the ice fields north of the college. Your objective will now be changed to find Septimus Signus and a quest marker will be placed at his location (in the ice fields north of the College of Winterhold). Go find him.

Once you find him, just talk to him. He will sound completely crazy and he it turns out that he knows he's crazy. He apparently has read and Elder Scroll and it messed up his mind. Just talk to him about everything you can and you will learn a lot from him. He will end up telling you that he also needs the Elder Scroll (or information from it rather) to get the Dwemer Lockbox open. He will give you a Lexicon that will need to be transcribed and an Attunement Sphere that will get you inside the the place where the Elder Scroll is kept. He will mention that he wants you to go deep within somewhere and when you talk to him more about it he will mention the Tower Mzark. The place deep within is Blackreach.


Your quest log will be updated during your conversation so that your goal is now to transcribe the Lexicon. For the Elder Knowledge quest, you should aslo have goal relating to recovering the Elder Scroll. You should now leave the outpost, head to Winterhold, then go SW to Alftand using the path behind the Jarl's Longhouse. As you leave the outpost, you will meet the Daedric Prince, Hermaeus Mora. You have no choice but to have a conversation and if you want a really cool reward, you should agree to help.

If you have already been to Saarthal, you can fast travel there first to save some travel time, but either way, just keep heading SW until you get to Alftand. Once you get there, go down the little wooden bridge thing until you get to the entrance of Alftand Glacial Ruins and head inside.

Once you are inside here, there is really only one path you can possibly take that doesn't dead-end very quickly - just keep going. Watch out for dwarven machines and Falmer throughout this whole quest. Throughout the whole quest, keep an eye out for rooms with locked doors - there are a number of them and many have some good loot in them.

Once you kill the Khajiit named J'darr, read his journal and then continue past the room where the spheres attack you to a room with a novice level locked gate. You'll want the treasure behind this gate. From here, go through the door to the NW and again keep an eye out for treasure behind locked doors (like the golden door not too far away).

Head into the Alftand Animonculory when you get to the door for it. Be careful of the pistons as you come in and then be careful of the trap a little later on. When you get to the gate that you don't have the option to open, you need to pull the lever to open it. Head down the big spiraling ramp and then when it ends, you just need to jump down to the platform, but be careful not to hur yourself by jumping too far. Then keep working your way down more spiraling ramp. There are a lot of Falmer through this part of the quest so just be careful not to get ganged up on by too many of them.

Soon, you should reach a door to the Alftand Cathedral - go through it. Head West into a grotto area, climb the stairs to the platform with the chests and lever, and activate the lever. Through the door that just opened you will meet a Dwarven Centurion - kill him and take the key from him.

Go up the stairs and open the gate behind which are two thieves named Sulla and Umana - kill them and open the master locked gate to the SW (your key will open it). Activate the Dwarven Mechanism which will use the Attunement Sphere from Septimus and unlock a stairway to Blackreach - go there.

As soon as you enter the area, look for the big crossbow in front of you on the platform - use the lever next to it to shoot it and kill the Centurion Sphere down below. Feel free to explore the area as much as you want, but watch out for Falmer and Chaurus. Eventually, head to the lake area with the stairs up to the little fort place. There are a bunch of Falmer so be careful as you cross the little bridge to get there. Then leave that area out the other side and ahead to the tomb thing marked with the quest marker. When you go in, there will be a lever that will take you to the Tower of Mzark - use it. Go through the door to the SW and enter the Oculory wehre you will find the puzzle.

Tower of Mzark Puzzle Solution:


There are 5 pedestals in front of you, 4 of which have buttons. from left to right, we'll call the buttons A, B, C, and D. To begin with, you should only have the C and D buttons active to use.

Before messing with the buttons, put the Blank Lexicon into the little stand thing to the right of the buttons. All you need to do is hit the C button 4 times in a row (this will make the B button active and make the Lexicon start to glow and rotate), then hit the B button twice (which will make the A button active), then the A button once.

This will cause the crystals to come down in the middle of the room. Pick up the Runed Lexicon from the stand, and head to the lowered crystals in the middle of the room. Grab the Elder Scroll from it's location in the crystal thing, leave via the door to the East, and use the lever  to leave to Skyrim. This will end the Elder Knowledge quest and will begin the Alduin's Bane quest. For these quests, you now need to head back to Paarthurnax at the Throat of the World.

To continue the Discerning the Transmundane quest, head back to Septimus Signus at his outpost North of The College of Winterhold. Go inside and talk to Septimus - follow the general conversation line and he will give you another task. This further work is to collect blood from every race of character alive in the world. Basically, you just need to go kill or find bodies of people of each race. Then when you click on them to search their bodies, you can choose to harvest their blood instead of searching them. Once you've done this head back and talk to Septimus.

When you get back there, tell him you've got the blood he wanted. He will take it from you and use it to open the Dwemer Lockbox. Follow him inside and he will die at the bottom of the stairs and Hermaeus Mora will appear again and your quest log is updated to tell you to take the book that is on the pedestal. Once you take it, you can read it and you will be given a choice between warrior, magic, and shadow (or something along those lines). Depending on which one you choose, you will be given a level increase in each skill from that skill type. For instance, if you choose, shadow, your light armor, sneak, lockpicking, pickpocket, and speech skills will all gain a level. Once you have chosen what skill set to increase, the book will be removed from your inventory and disappears. This concludes the quests.