Showing posts with label walkthrough. Show all posts

Monday, June 2, 2014

05/06 Kawasaki ZX6R GP Shift (reversed shift) Conversion

Since I started riding sport bikes, I have heard a lot of people (especially those who do track days) talk about converting their bikes to GP shift. Initially, I didn't know what that meant and didn't really care too much since I didn't feel that, as a new rider, changing anything about the shifting of my bike would be a good idea. If anyone reading this doesn't know what that means, it basically reverses the direction of shifting so that, from neutral, 1st gear is up and 2nd through 6th gears are down.

I'm told that this is useful at the track to avoid hitting your toe on the ground when trying to upshift in a left-hand corner (makes sense, but never experienced that myself). For me, it seemed like an interesting idea after riding for a couple years because timing of upshifting is so much more critical than downshifting (for me).

Well, after thinking about it some, I decided to try it out on my 2005 ZX6R and it turns out it's a lot easier than everyone I had talked to made it seem. I was told by numerous people that it can't be done easily (like it can on many other ZX6R's) on the 05/06 ZX6R's because the frame gets in the way of the shift linkage. While this is true to some extent, the frame getting in the way does not actually preclude doing the conversion. All that needs to be done is to shim the pivot point so that the linkage will clear the frame - not a big deal.

So, if you are attempting this conversion yourself, you'll need a few things:

  • 10mm wrench
  • 6mm allen wrench
  • about 3/8in worth of washers that will fit on the pivot bolt for the shift lever

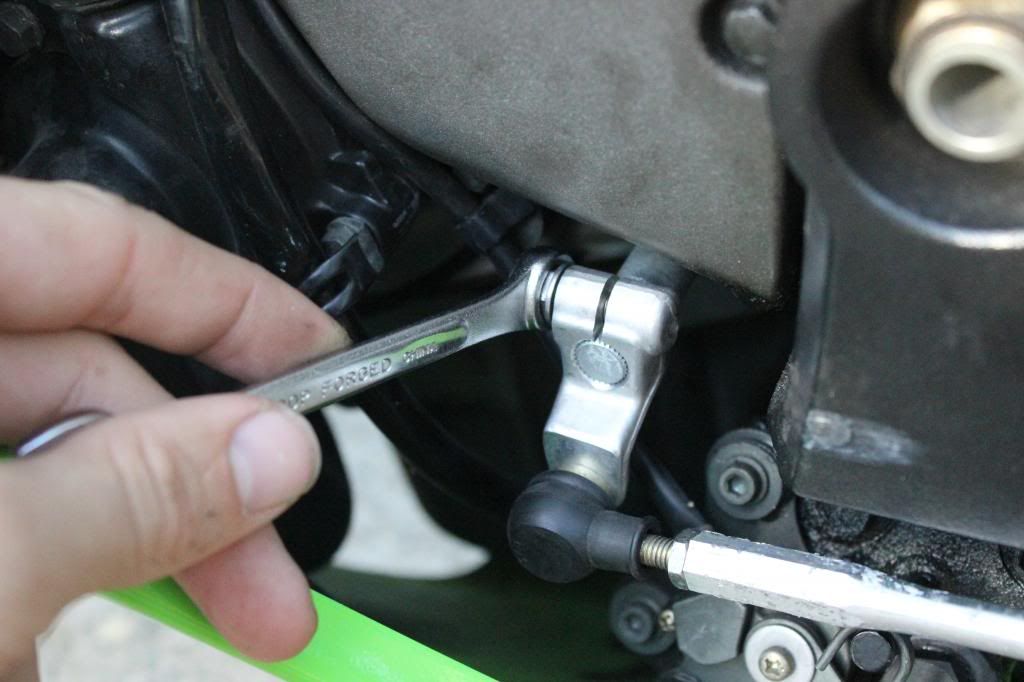
All you need to do is to use the 10mm wrench to loosen and take out the bold that holds the external shift linkage to the internal mechanisms. Before doing this, take note of where your shift lever is in relation to the frame or something as you will probably want to get it back to being at about the same angle it is currently.

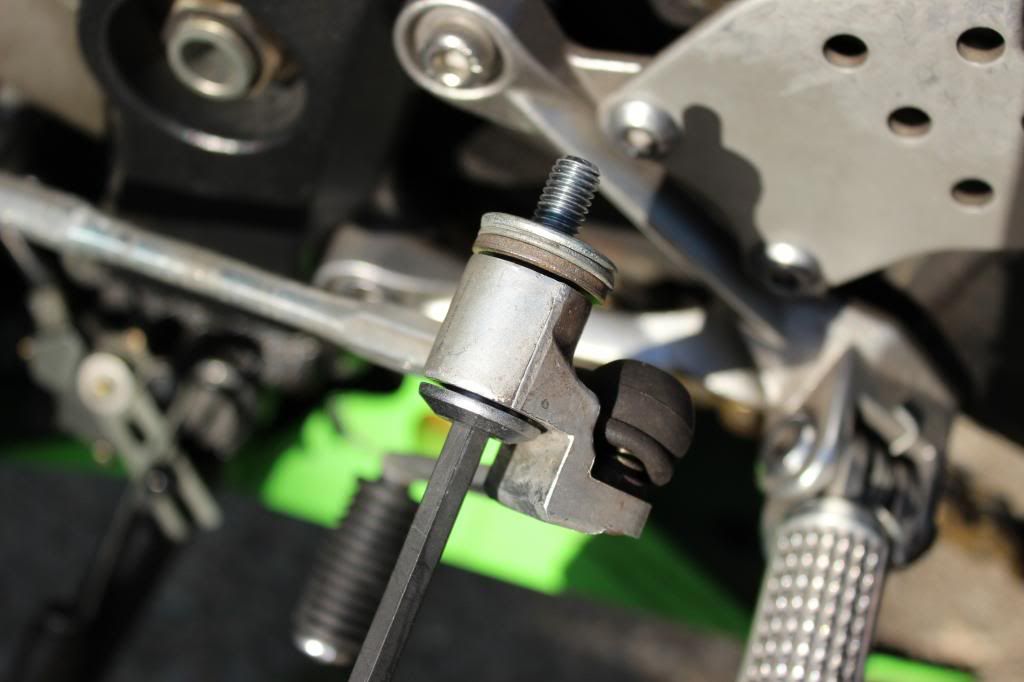
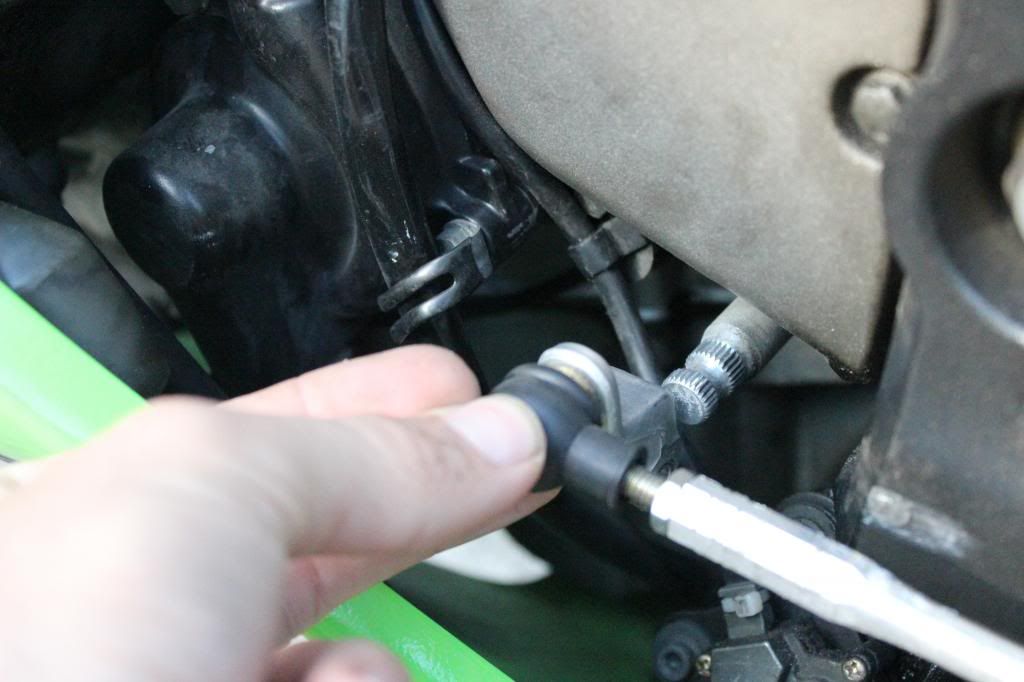
After removing this, you need to flip it upside down and put it back onto the post so that the shift lever is at about the same angle it was before you flipped it over. You'll notice, now, that it won't go all the way on because the arm of the shift linkage comes into contact with the frame. That's ok, leave it for now and come back to it in just a moment.

Now use the 6mm allen wrench to loosen the pivot bolt for the shift lever until it comes out far enough that you can get the other piece all the way onto it's post and put the bolt back in and tighten it up (you won't need to mess with that again).

Now all you need to do is take that pivot bolt all the way out and put some washers on it so that it will stay where you have it right now. To do this, just use your 6mm allen wrench to back it all the way out of it's housing leaving the actual shift arm connected to it over the smooth portion of it. Then put on a few washers and put it back in. Do this until you are happy with the clearance between the shift arm and the frame.


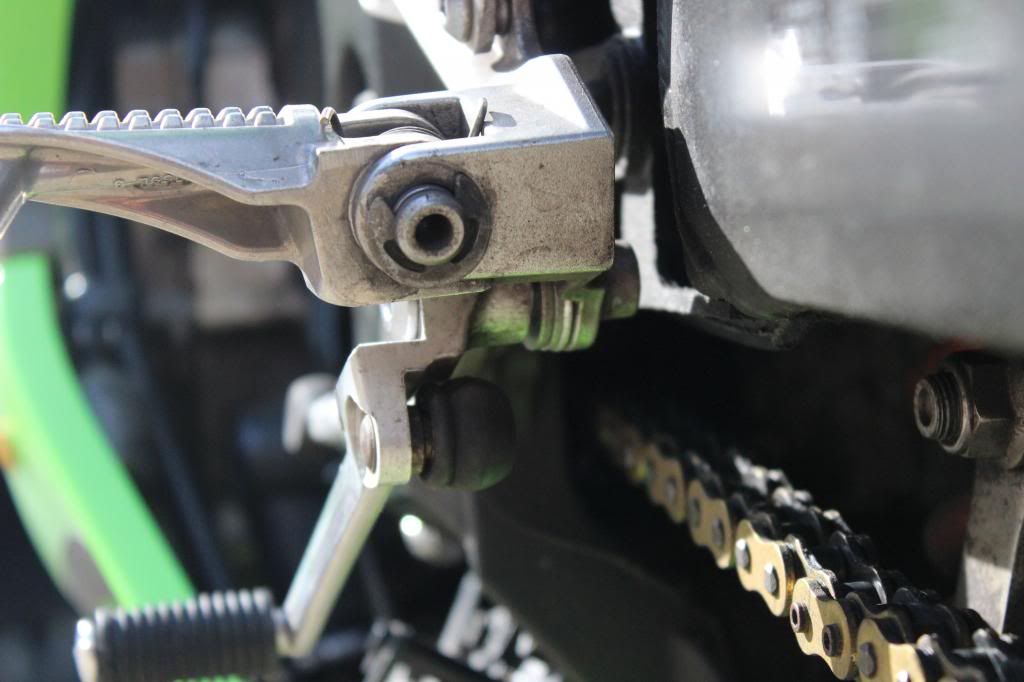
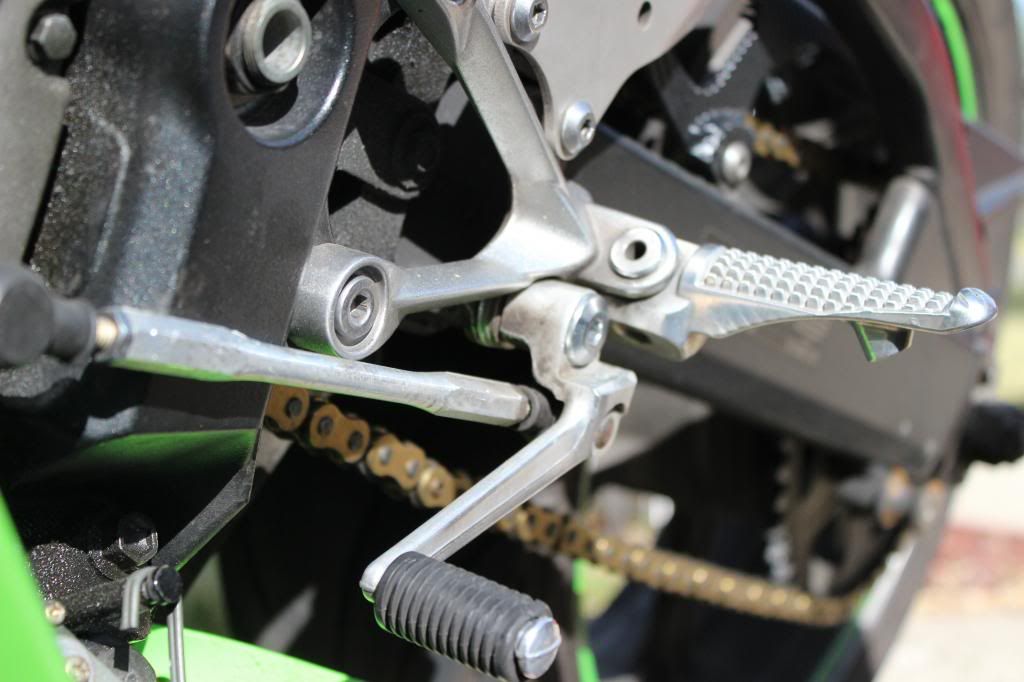
The following photos are how it should all end up looking if you've done it properly. From the back:


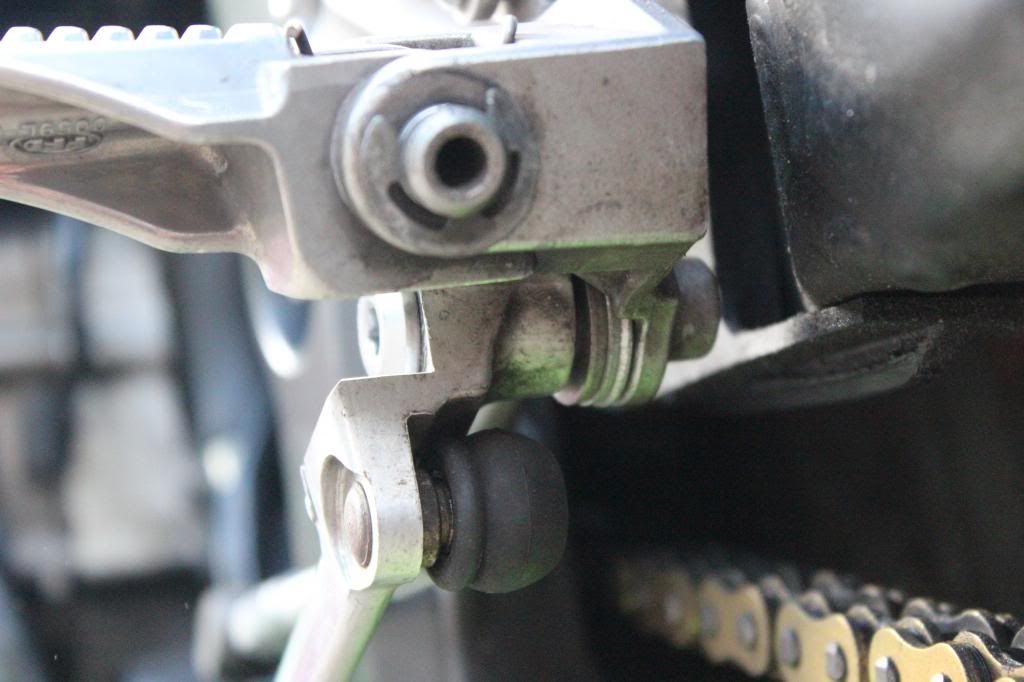
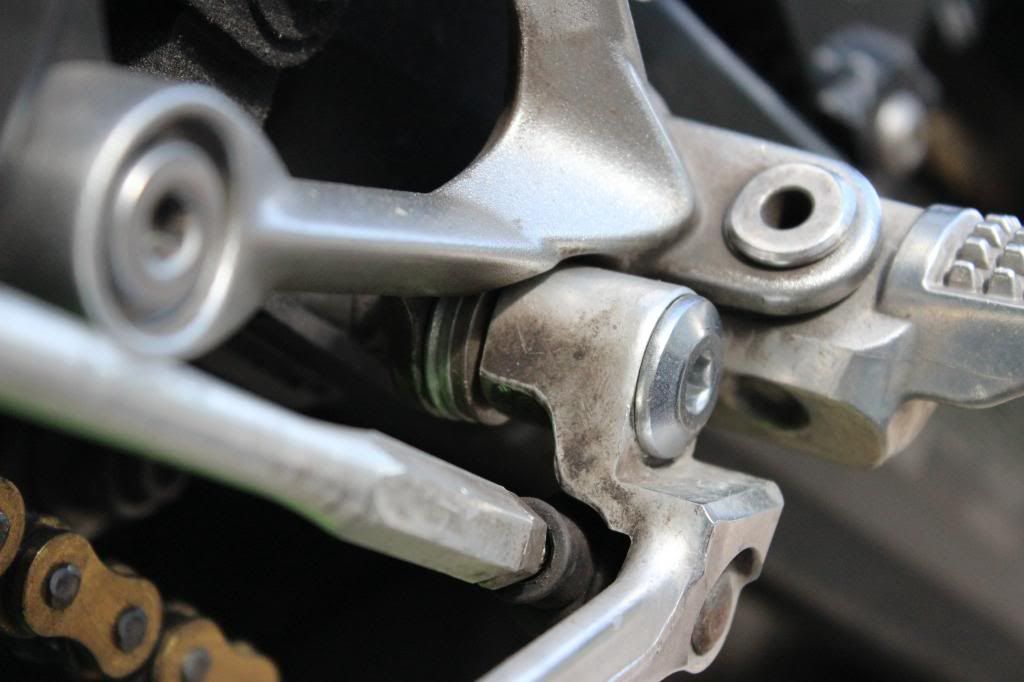
From the side:

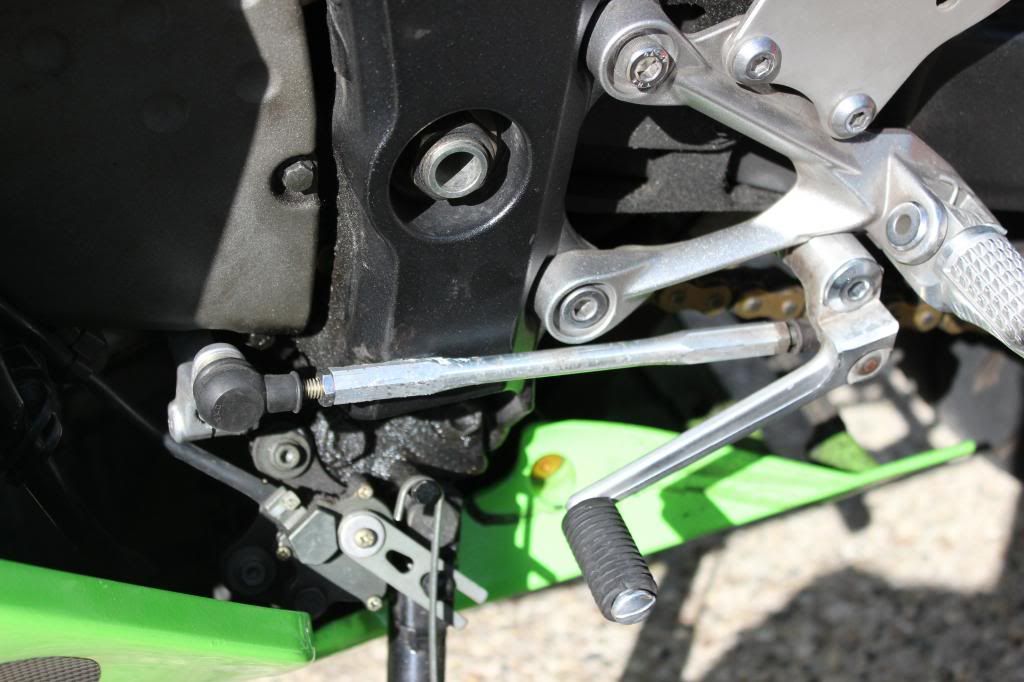
From the front:


As you can hopefully see, I used 3 washers (ones I had laying around) to shim out the shift pivot so that the linkage would clear the frame. If anything is unclear, please be sure to comment and ask so that I can make sure to address any issues!

Thursday, December 29, 2011

Skyrim: The World-Eater's Eyrie / Skuldafn Temple / Sovngarde / Dragonslayer Walkthrough

This quest is relatively straight forward and probably does not require a lot of guidance, but there are a few stages that are more tricky and there are a couple of puzzles to solve.

This quest is first initiated when you use the Call Dragon shout on the Dragonsreach Porch to call Odahviing and trap him. Once you have him trapped and have a conversation with him, you end up getting him to reveal the location of Alduin's portal to Sovngarde and then flies you to Skuldafn.

Once you get to Skuldafn, there will be a number of high level Draugr (wraiths and deathlords) before you get to the door to head inside the Skuldafn Temple. I did not count exactly, but there are at least 8 Draugr (some deathlords, some wights, etc.) and there are two dragons. Be careful not to attract the attention of everyone all at once or it will be a very difficult fight.


Head up all the stairs and around the broken tower and up the stairs again to get up to the door that says Skuldafn Temple. This is where you want to go. You can check out the North and South Towers out here if you want as well, but there is not much to tell in them except some more Draugr. Once you get inside the Skuldafn Temple, you will enter a big room with a number of Draugr that come after you almost at once. Kill them and continue forward. You will end up heading up some stairs into a room where more Draugr will attack you. After you kill them, you'll probably notice there are three of the infamous pillars and two gates in front of you. The two side pillars need to be positioned so that the symbol that faces the nearest fire bowl matches the one carved there. The center pillar needs to match the symbol above the gate you want to open.

If you face the pillars from the gates, to open the right gate, you need to see bird - bird - bird and the left gate you should see bird - snake - bird. This is what is shown in the two pictures at the right. The right gate has a chest with not much in it and nothing else behind it. The left gate is the one you need to go through in order to continue with the quest.

After going through the left gate, you will go up some stairs to the left and end up on the walkway above a room with a single Draugr Wight below you. As you approach him, a Deathlord and another Wight will also begin to attack you. After you kill the three of them, head straight through where the Draugr Deathlord came out of. There will be frostbite spiders you need to kill in this area, but they shouldn't be much of a problem. Kill them and continue on along the corridor until you reach the double iron doors. Through these doors are another two Draugr - a Deathlord and a Wight. As soon as you open the doors you will notice another pillar. After killing all enemies you will probably notice that there is no exit from this room. The pillars are what provide the exit to you.

The picture on the left shows you the location we are talking about and will be the reference frame used for explaining the solution. While looking forward towards the wooden bridge that will drop, the pillar on your right needs to be set to the bird, the one to your left needs to be set to whale, and the one behind and below you needs to be set to snake. So that puzzle solution from left to right would be whale - snake - bird. These symbols come from the symbols shown in the mouths of the people corresponding to them. Going across the bridge will allow you to access a door that again is labeled Skuldafn Temple. You need to continue through this door to continue with the quest.

When you go through these doors you will enter a room that has another three Draugr in it. There is a Deathlord, a Wight, and a Scourge. Defeat them and continue up the stairs, across the bridge, and through the corridor to the spiral staircase. At the top of the spiral stairs is a room with three more Draugr and a gate that needs to be opened by lever. directly across the room from the gate is an iron door behind which is flammable oil on the floor which can help kill the Draugr. If you go through that door and turn left 180 degrees you'll see a lever that will lift the gate so you can continue forward.

As you continue forward through the passageway ahead, be careful of the flammable oil trap. When you turn left at the end of the corridor with this trap, straight ahead will be a puzzle door and a Draugr Death Overlord guarding it. Kill the guard and take the Diamond Claw from him to get through the puzzle door. The solution from top to bottom is wolf - moth - dragon (as shown at the right).

This door will allow you to enter a room with a word wall in it. This word wall gives you a word for the Storm Call shout. There are no more Draugr in this section of Skuldafn so you may go straight up to the word wall and then continue on without worries. If you continue toward the quest marker, you will get to a door that says Skuldafn. Be prepared before leaving through this door. After you leave the door, you will be in an area with three Draugr Deathlords, a Draugr Scourge, two Dragons, and a Dragon Preist. Be especially careful of the Dragon Priest as he has a staff that will do 50 shock damage per second. You can get to him before he grabs the staff, however, if you move quickly. He will start heading for it as soon as you go out the door - he is out the door and to the left and then up the stairs. Get to him as quickly as possible, but still try to avoid having all enemies attacking you at once.

Also, the wooden planks that go to a tower straight ahead of you as you exit the door, follow them before going through the portal. All the way at the bottom there is a chest with, among other things, a flawless diamond in it.

Once you have defeated all the enemies, you will be able to get to Alduin's portal to Sovngarde. To use the portal, you need to activate the Dragon Seal, then you can simply walk into the portal. If the Dragon Priest has not yet reached his staff, then all you need to do is to walk into the portal.

Once you have gone through the portal, you will need to make your way through the mist to get to the Hall of Valor. You will meet a soldier quite quickly who will tell you how to get there and will follow you. You need to simply keep walking through the fog and get to the bridge. When you get to the bridge to the Hall of Valor, you will meet Tsun with whom you need to talk and later fight in order to gain admittance to the Hall of Valor.

Once in the Hall of Valor, you will speak with Ysgramor who will tell you that they were all commanded by Shor not to attempt to fight Alduin, but that there are three who have been waiting for me to come which would be their cue to join you and drive Alduin out. As it turns out, these are the same three people who you saw fighting Alduin when you read the Elder Scroll to learn Dragonrend. Follow them back outside where you will finally get to kill Alduin. I found it easiest to use Dragonrend to keep him on the ground and attack him that way.

Once you have killed Alduin, there are some awesome animations as he dies and then you just need to go talk to Tsun again to be sent back to Nirn. When you talk to him and tell him you want to go back home, he teaches you a shout to bring a hero from Sovngarde to aide you - the Call of Valor shout. This is officially the end of the main quest. Congratulations on completing an Elder Scrolls game.
Tuesday, November 29, 2011

Skyrim: Revealing the Unseen / Mzelft Oculory Puzzle Solution

This is not a full walkthrough of the quest because most of it is very straightforward, but at the towards the end of the Revealing the Unseen mission, there is a puzzle. This puzzle occurs when you are in the Mzelft Oculory and you need to adjust the focus crystal.

All you need to do is use a frost spell (or maybe fire if you've already messed with it) on the crystal a few times until the beams of light each shoot into the center of a different ring around the ceiling. If you go use the buttons up on the platform, each of them rotates a different ring and each ring has a green crystal in it. You need to rotate each ring until the crystals are each hit by a beam of light from the crystal in the middle. It is quite a simple process once you figure out what you're supposed to be doing. Just use a frost spell a few times and then rotate the rings.

See the picture if you are confused about what this is supposed to look like.

Monday, November 28, 2011

Skyrim Walkthrough: Joining Thieves Guild / Taking Care of Business

After you have either completed or messed up the A Chance Arrangement quest with Brynjolf, he tells you that you can help his "organization" if you're up to it.

He tells you that there is a pub called the Ragged Flagon down in the Ratways of Riften that is run by his "organization" and that if you can make it there in one piece, he'll give you more work.

This is a very straight-forward quest and takes very little effort if you are above level 10 ish. All you need to do is follow the quest marker to the door into the Ratway. You will find it on the lower level off the walkway that follows the water very near the little marketplace area. Once you've gotten in, simply follow the path ways until you get to the Ragged Flagon. Unlike sewers in some other games, this initial part of the Ratway not a maze at all. There are some little rooms here and there as well as about 4 people to kill on your way, but you should have no difficulty finding the Ragged Flagon.

Once inside, go around the little lake thing and go talk to Brynjolf who will be standing near the bar (with a quest marker on him). When you talk to him, he will be surprised that you made it and will tell you that now he has more work for you. He will tell you about 3 people who owe the Thieves Guild money. He tells you that what is more important than the money is getting them to understand that the Thieves Guild is not an organization to mess around with. If you keep talking to Brynjolf, he gives you valuable information about how you can manipulate each of these people into doing what you want.

Again, just follow the quest markers to the locations of each of the three people. I started out talking to each of them without doing the extra manipulation technique mentioned by Brynjolf. This only worked on one of them for me and I was forced to use his advice.

Each of these three people is found right in Riften and none of them are found far from the door to the Rateway so you don't even need to walk much. Tell each of them that Brynjolf has a message for them - if they don't respond by giving you the money then go to the manipulation technique (the dwemer vase, the statue, or Talen-Jei).

Once you have gotten the money from each of them, go back to the Ragged Flagon and talk to Brynjolf. He will tell you that with the way you handled these three, he thinks his "organization" could use you some more. He will give you a few potions for the work you did and you will be able to ask him fo more work now.

Thursday, November 17, 2011

Skyrim Walkthrough: A Chance Arrangement / Unusual Gem / Join Thieves Guild

There are a few places in Skyrim that you can pick up what is called an Unusual Gem. It is a red gem that rotates inside a golden box. The first time you find one you unlock a Miscellaneous Quest with the objective, "Bring the Unusual Gem to an appraiser." If you activate this quest, you can follow the quest marker to a guy down at the Riften docks named Maul. If you are not already part of the Thieves Guild, all he will say is "Get in good with Brynjolf, then we'll talk."

This is mostly useless unless you've already done a lot of exploring around Riften without joining the Thieves Guild. Brynjolf is a guy who can be found in the Riften market selling a red elixer. If you talk to him he will offer you the opportunity to meet him during the daytime for some undisclosed (but shady sounding) activity. What he wants you to do is to steal a ring from a person named Madesi's stall at the market. Apparently these two people have some kind of feud going because of the elixer that Brynjolf sells.
As it turns out this quest is what is needed to get in Brynjolf's good graces as well as what is needed to join the Thieves Guild. When you talk to Brynjolf again in the day-time, he tells you that he is going to make a distraction and then you can steal the ring. It is relatively easy to do, but if you mess it up there is another chance to join the guild and to get on his good side. Skip to the bottom to see that if you mess it up.

Once Brynjolf starts distracting people, you just need to get behind Madesi's stall, pick the lock to get into the stall and then pick the lock to get into the box within the stall. If you just leave your lockpick straight upright on both, you will open them right away. Take Madesi's Silver Ring from the box (and everything else while you're at it) and exit the screen. Then head over in front of Brynjolf and go into sneak mode. You need to put the ring into Brand-Shei's pocket without him knowing it so you need to get into sneak and pickpocket him in order to add the ring to his pocket. Once you've done that, Brynjolf will disperse everyone and your quest log will be updated to tell you to return to speak with Brynjolf.

When you go back and talk to him, he will pay you for your help and will suggest that if you want to do more of this sneaky type of work, you could probably make good money at it. This finishes the A Chance Arrangement quest. If you investigate further he tells you that his "organization" is having some difficulties and could do with some help. If you think you're up to it, you should go for it. If you say that you can handle it, he'll tell you about the Ragged Flagon which begins a new quest called Taking Care of Business.

If you messed up something with the original plan with the ring, you can still go back and talk to Brynjolf and it will jump straight to giving you the Taking Care of Business quest.

Once you are into the Ragged Flagon, you can go ahead and talk to Vex about the Unusual Gem you found. She will tell you all about them. This conversation will begin the No Stone Unturned quest - SPOILER ALERT: my No Stone Unturned quest walkthrough has locations of the stones you need to find.

Wednesday, November 16, 2011

Skyrim Walkthrough: Dark Brotherhood - Innocence Lost

This is a very brief tutorial for how to go about joining the Dark Brotherhood in Skyrim.

If you go to Windhelm and talk to NPC's, many of them will mention a very troubled boy named Aventus Aretino whose mother died recently. At some point, you have the opportunity to talk to a mother near his house who tells you that Aventus has been trying to contact the Dark Brotherhood.

Once you have found out where he lives and that he is trying to contact the Dark Brotherhood, then you should break into his house. This is quite easy to do since there is normally nobody outside and it is a novice lock level.

Go upstairs and talk to Aventus. He will tell you that his mother died and he was sent to an orphanage called the Honorhall Orphanage in Riften. He will tell you about how he escaped and then performed the ritual to call an assassin from the Dark Brotherhood. He will tell you about Grelod the Kind who runs the orphanage and is terrible to all the kids there. He believes that you are a Dark Brotherhood assassin who has come to answer his call, so he asks you to kill Grelod the Kind for him.

At this point, your quest log gets a quest called Innocence Lost added to it and updated with the objective to kill Grelod the Kind.

Travel to Riften and find the orphanage. Once you get there, you will witness a scene of Grelod threatening the kids. If you talk to any of the kids or the other woman at the orphanage, they all say that Grelod is aweful and that the "kind" title is a sarcastic slight against her. You can talk to Grelod, but it is quite a short conversation which ends with her simply ignoring you. You can then kill her which updates your quest log with the objective to go back and talk to Aventus.

When you talk to Aventus, he is incredibly pleased and rewards you with a family heirloom. This successfully concludes this quest.

At some time later, a stranger will approach you with a letter that has a hand print and a line saying "We know." He does not know where it came from or anything else about it. Once you receive this letter, the next time you sleep, you will wake up in an unfamiliar location and will be greeted by a masked woman from the Dark Brotherhood.

Tuesday, November 15, 2011

Skyrim Walkthrough: Good Intentions

This quest begins when Urag asks you to mention the book called "Night of Tears" to Tolfdir.

Objectives
  • Speak with Tolfdir

Find Tolfdir, most likely in the Hall of Elements. Speak to him and tell him Urag suggested you come see him. Tell him about "Night of Tears". Tolfdir will be distracted by the orb from Saarthal, and has some additional thoughts about it. Listen to what he has to say.

Ancano will come and interrupt. He has some important information. He needs you to come with him immediately. He will tell you someone from the Psijic order is here in the college and is asking to see you specifically. Follow Ancano. Enter the Arch-Mage's quarters. Speak with Quaranir. Ask him what's going on. He will tell you about the Eye of Magnus. The longer it remains in the college, the more dangerous the situation becomes. He will tell you to seek out the Augur of Dunlain within the college.

If you look at your quest journal, it now says "I've been led to the Arch-Mage's quarters by Ancano, who was insistent that I speak to someone claiming to be from the Psijic Order. The monk, named Quaranir, has informed me that the "Eye of Magnus" is dangerous and that to learn how to deal with it, I need to speak with the Augur of Dunlain within the college. I should ask my fellow members where to find him"

Your objective is to find the Augur of Dunlain. You can talk to a number of different people around the college about the Augur and all of them tell you to go talk to Tolfdir. When you talk to Tolfdir he tells you that the Augur is in the Midden which is below the college. He also mentions that the Augur was once an incredibly talented student of the college, but that there was an accident and he has been in the Midden ever since. He tells you that if you are going to see the the Augur, to say hello from him.

Open your map and use it to find the entrance to the Midden (or just follow the marker on your compass). Find the grate on the floor and enter the Midden. Descend down the tunnels, fighting some draugr and spiders on the way. Go through a wooden door and enter the Midden Dark. Cross an icy bridge and enter through a door. Activate the Augur of Dunlain. He will tell you your efforts are in vain, it has already begun. He will tell you that you blindly follow the path to your own destruction. He will tell you that Ancano is also looking for information about the eye of Magnus (the orb thing) and that the only way to see through the eye is using the Staff of Magnus. So he tells you that you will need to find the Staff of Magnus and to go tell the Arch-Mage this information.

Now your objective changes to reporting to Savos Aren. Retrace your path back to where you came in. You will see a ladder here which will lead you back up to the courtyard in the college where the trap door was. Go back into the Hall of Elements to find Savos Aren near the Eye of Magnus. Talk to him and tell him you have important information for him. Tell him you need to find the Staff of the Magnus. No matter what conversation line you follow you will end up telling him that you talked to the Auger. He will be impressed with your initiative and wants you to follow up on this. He recalls Mirabelle mentioning something about the staff and recommends you check with her.

He rewards you with a Mage's Circlet which increases Magicka by 30 points. This completes the quest "Good Intentions" and unlocks the next College of Winterhold quest, "Revealing the Unseen."

Skyrim Walkthrough: Hitting the Books

You obtain the quest "Hitting the Books" from the Arch-Mage, after completing the Under Saarthal quest.

Since Tolfdir is not available, you get asked by Mirabelle Ervine to look into information on the object we found in Saarthal by talking to Urag gro-Shub in the Acanaeum

You can enter the Arcanaeum through the Hall of the Elements. Talk to Urag behind the desk and tell him you want to learn about something you found in Saarthal. He will tell you he can't help since his books got stolen by Orthorn when he went to Fellglow Keep with the others who left the college. Apparently, one of the volumes Orthorn stole has the information you need.

If you look at the quest journal, it has been updated: "I've been asked to find more information on the object found in Saarthal. Urag suggested that useful books may have been stolen from the Arcanaeum by Othorn, a former apprentice at the college. His last known location was Fellglow Keep." You will also have something that shows how many of the three stolen books you have recovered.

NOTE: I would advise bringing Lydia with you if you are not above level 10 when starting this quest as there are a number of difficult opponents. It would also benefit you to have a ward spell since you will be fighting mostly mages during this quest.

Ancano will ask you some questions as you leave. Answer his questions and leave the college. Head to Whiterun, leave via the main gate, and travel East to Fellglow Keep (it's past the Honningbrew Meadery and White River Watch).

NOTE: It would be a good idea to pay attention to the books that are scattered throughout Fellglow Keep (not just the ones you need) because there are many spelltomes as well as books that increase skills.

Apparently there is a main door which is locked and requires a key, but you can find a door in a ruined tower which you can get in by. I believe this door is the one that is marked with a quest marker when you have this quest active.

Work your way through the flooded caverns. Go east, then south, kill a mage and 2 spiders, then head NE and arrive at a room with some cells. Activate the levers to release the imprisoned vampires, then keep going NE to another chamber with jail cells where a mage will release wolves at you. Once you have killed the mage and wolves, talk to Orthon through the bars and tell him you are here for the books.

He will tell you that if you free him, he will help you find the books. Free Orthorn by activating the middle lever. Open the wooden door and go down the stairs. Orthon will help you fight a group of mages after which you need to climb up the stairs, go to the end of the corridor and turn left. Open the door to Fellglow Keep and head NE towards the Fellglow Keep Ritual Chamber. There is basically only one path you can take which will bring you through multiple rooms with a number or opponents. Make sure that before you get to the Ritual Chamber, you kill the mage who has the Fellglow Keep Key (should be the last person you kill before getting to the door to the Ritual Chamber). Go through the wooden door to the north and climb up the stairs to the Ritual Chamber. Be ready to fight when you enter because the Caller inside is quite a powerful mage for this stage of the game.

You will find the Caller inside this room. At some point in the conversation you have no choice but to tell her you are not leaving without the books. Fight her, kill her and take the three stolen books (these all should have quest markers to show you where they are). Loot the caller for the Ritual chamber key and enter a small room nearby with lots of treasures. Then exit down through the grate on the floor. Raise the bar and open the wooden door. Use another door to exit to Skyrim. Fast travel to the College of Winterhold and go the the Arcanaeum to return the books to Urag.

This complete the quest "Hitting the Books" and unlocks the next quest in the College of Winterhold series, "Good Intentions"